Jun 19, 2012

Coconut Crusted French Toast with Coconut Syrup


I came up with this for Father's Day. One of our family traditions is breakfast in bed for Mother's Day, Father's Day and birthdays. I never like to repeat myself with the making the same breakfast that I have made in the past. I decided to spice up an old classic. I used as much coconut as I could think of for these babies. Coconut crusted french toast with coconut syrup! If you are a coconut lover, you will love it! I thought it turned out delicious. And Broc loved it. Really, that was all that mattered, since this special breakfast was for him!

I think it would have been even better topped with some fresh raspberries. But since this little island is fresh out of berries, I just gave him a banana to enjoy it with instead!

Coconut French Toast


2 eggs
2/3 cup coconut milk
pinch of salt
1 teaspoon vanilla extract
1/4 teaspoon pumpkin pie spice
1/4 cup flaked coconut, sweetened
6 thick slices of bread

Combine ingredients. Dip each slice of bread into egg mixture, soaking both sides. Place in hot pan and cook on both sides until golden brown. Serve hot. Top with coconut syrup and flaked coconut.


Coconut Syrup


1/2 cup butter, (1 stick)
1 cup sugar
1/3 cup cream of coconut
3/4 cup coconut milk
1 tablespoon corn syrup
1 teaspoon baking soda
pinch of salt
1 teaspoon vanilla extract

In a saucepan, place butter, sugar, cream of coconut, coconut milk, salt and baking soda. Stir over medium heat until butter melts and sugar is dissolved. Bring to a boil, and boil for about 5 minutes, stirring constantly. Remove from heat and stir in vanilla extract. Serve warm.

Pin It!

Jun 7, 2012

Tin Foil Dinners


I was reintroduced to these on Christmas Eve. I remember having tin-foil dinners before, but I had forgotten how fun and yummy they were. It was our first Christmas in the Caribbean, without snow. We met some friends at the beach for lunch, where sand angels were a fun alternative to snow angels! My friend Nicole brought tin-foil dinners. They tasted so yummy. It was like a Sunday dinner all wrapped up together. I was raving about how amazing these tasted and she was telling me how easy they were to put together. I was inspired to come up with my own version of tin foil dinners. It has become a favorite meal for our family to take and eat by the beach while watching the sunset on the ocean. It is the perfect meal to take to the beach or on a picnic or obviously camping. They are individually wrapped in foil, so they are actually stay hot for a while, after coming out of the oven.


Tin Foil Dinners

Makes 10-12 dinners

2 lbs. ground beef
1 medium sized onion (or 2 small onions), chopped
3 cloves garlic, minced
1 package Lipton Beefy Onion Soup Mix
1/4 cup ketchup
2 tablespoons A-1 steak sauce
1 tablespoon Wochestershire sauce
1/2 cup cheddar cheese, shredded
2 teaspoons spicy brown mustard
salt
pepper
6-8 carrots, sliced
red potatoes, quartered (I used one potatoe for each dinner)


Preheat oven to 400 degrees. Cut tin foil into 10- 12, one foot squares. Lay squares of foil out.

Quarter potatoes and slice carrots. Set aside.

Combine ground beef, onion, garlic, onion soup mix, ketchup, steak sauce, Worchestershire sauce, cheese, mustard, salt, pepper. Shape into patties and place on foil squares. Add potatoes and carrots over the patties and sprinkle with salt and pepper. Wrap dinners closed. Place in hot oven and cook for about 45 minutes to an hour or until meat is cooked all the way through and vegetables are tender. Enjoy with ketchup or hot sauce!


Pin It!

Jun 4, 2012

Homemade Tortilla Tutorial


I was asked the question a few days ago, what my favorite food cuisine was? Hands down, without thinking- MEXICAN! Tacos are one of my favorite meals, ever. You know a good fresh fish taco with a nice creamy cilantro lime sauce wrapped up in a delicious homemade tortilla. Ah, tortillas- homemade, soft, warm tortillas! These tortillas are the thing that make those delectible tacos so amazing. Now, I do purchase store bought torillas on occasion when I am in a time crunch. But I am telling you there is just no comparison. These are hands down better than any tortilla you can buy in a bag. And they are worth taking the time to make them. If you are going for a "wow factor" make these the next time you make tacos! YUM!

I had never made homemade tortillas before moving to the Caribbean. We live on a small little island where you pay a pretty penny for store bought tortillas. Now, while living on a med-school budget can be challenging at times (especially living in a place where everything is 2x more expensive), it does have it's upside. This is when I was forced introduced to making homemade tortillas. And I am so glad I was. I got the recipe from my friend Kristen, who took me in and showed me what I had been missing my whole life. And now I just can't imagine my life with out them. Seriously, these babies are life changing! Make them! Your family will be forever grateful!


Homemade Tortillas


3 cups flour
2 teaspoon baking powder
1 teaspoon salt
4-6 tablespoons shortening
1 1/4 cups warm water

In a large bowl, combine flour, baking powder and salt. Cut in shortening using a pastry blender or a fork. (I will continue to use a fork while my pastry blender sits in storage. One day we will be reunited!)  Add warm water and knead for about 8 minutes. You can see a difference in the dough after you knead it. It has almost looks shiny and smooth. Cover and let dough sit for about 10- 15 minutes. 

Roll into a ball just a little bigger than a gold ball, flaten, then roll out on a floured surface. 

Cook on an ungreased skillet about 1 minute per side or until tortilla starts to bubble. Place on a plate and cover with foil. This will help keep them nice and warm until you are ready to serve them.
 
I had a friend ask me to post my recipe with a tutorial. So here it is: 


Make your dough. After you have let it sit, roll into balls just a little bigger than a golf ball.


Take one of your dough balls and flatten it out on a floured surface. 
Turn to cover with flour.


Roll out into a circular shape


Over medium heat, place tortilla on skillet. Cook until you start to see bubbles 
(about 1 minute or so per side). When you see bubbles, flip it over. 


I usually have a system going where I am rolling out the next tortilla
while the other is cooking. If you do this, make sure to watch the cooking tortilla.
Do not overcook!!! If your tortillas are dry or hard you have over cooked them. 


Place cooked tortilla on a plate and cover with foil. 
This will help them stay warm until you are ready to use them. 


Enjoy!

Pin It!

May 31, 2012

Mini Frittatas


I had planned to make a breakfast casserole for a baby shower that I was helping with. But I couldn't find some of the ingredients. We are limited with our resources here. So, I had to resort to a plan B. At the time, I wasn't really sure what that was. Then I had remembered I saw a photo floating around on pinterest that had eggs in a muffin tin. I thought I would attempt to make something from that idea. I mixed all of my ingredients together and threw them in a muffin tin. I was a little nervous, not following a recipe and unsure of how the end result would turn out- especially making it the morning of the shower. Luckily, they turned out and tasted divine, especially topped with a dollip of salsa! Is it just me or is everything so much cuter when it is in mini form? Simply perfect for a brunch.

After I made them I thought, this would also be a great breakfast for school days as well. Throw the stuff together the night before, or at least have all of your chopping and shredding done, and then just bake them in the morning! Enjoy!


Mini Frittatas


12 eggs
3/4 cup milk
1 cup pepper jack cheese, shredded
5 slices deli ham, diced
1/2 medium sized green pepper, chopped
green onions, chopped
hand full of fresh cilantro, chopped
1/2 teaspoon salt
1/2 teaspoon pepper
crushed red pepper flakes, just a few shakes - depending on how much heat you like.

Preheat oven to 350 degrees. Spray muffin tin with cooking spray.

In a large bowl, beat eggs and milk. Add cheese, ham, green pepper, green onions, cilantro, salt, pepper and crushed red pepper flakes.

Fill muffin tin with egg mixture. Bake for 40-50 minutes or until tops of frittatas are nice and golden brown. Take a knife and slide it around each egg. Carefully remove frittata from pan. Serve hot.


*When I made these, I filled each muffin tin to the very top with the egg mixture. And it made 12 muffin sized frittatas. I am sure you could just fill them 1/2- 3/4 of the way full and get about 20 out of the batch.


Pin It!

May 28, 2012

Bloggin' Cafe & Malasada Tutorial

 My friend Chris, who is a fabulous chef, hosted a little blogging cafe. Since this was sort of a first for me, I wasn't really sure what to expect. Let me tell you though, it was so much fun! Seriously, what could be better than hanging out, yummy food and blogging?! Chris showed us how to make Malasadas, or otherwise known as Portuguese Donuts. They were to die for! So light and fluffy, topped with a little glisten of sugar. Chris has some pretty incredible recipes on his blog, you can check them out here. And if you want some other fabulous reads, you can also check out the other fellow blogger's amazing blogs: c squared w, Priceless Adventure, and Donuts at Midnight


Now onto these delectable little treats! 


Malasadas
<<Portuguese Doughnuts>> 
Courtesy of Chris McGilvery


1 package of dry active yeast (.25 ounce)
1 teaspoon of sugar
1/4 cup warm water
6 cups of flour
1 teaspoon of salt
1/4 cup sugar
1/2 cup honey 
1/4 cup butter, melted
1 cup evaporated milk
1/4 cup water
2 cups sugar
1 - 1 1/2 quarts vegetable oil

Mix yeast, 1 teaspoon of sugar and warm water. Set aside to proof. 

In a large bowl, mix the flour and the salt together. Make a well. 

Whip the eggs until smooth. Pour eggs, yeast, 1/4 cup sugar, honey, melted butter, evaporated milk, and water into well. Whip it until mixture becomes doughy. It may be a little sticky. Cover and let rise until doubled. This usually takes about 45 minutes.

Heat oil to 350 degrees. I would recommend that you heat up pan, add oil and lower the heat so the oil won't be too hot. The donuts will cook too fast and burn if the oil is too hot.

There are several ways to fry this treat. 
  • You can throw in dough by spoonfuls. Just make sure you throw it in carefully.
  • Roll out dough and cut into squares (this tends to be a sticky mess though).
  • Put dough in a pastry bag and squeeze donut hole sized balls into oil.
I think it would be okay to make the donut holes just a little bigger than a regular sized donut hole. 

Finally roll or shake cooked donuts in sugar. Serve hot and warm! You may even want to add cinnamon to the sugar or shake donuts in powdered sugar. Enjoy! 


For those of you who are thinking any sort of homemade doughnut is going to be way too much work, don't check out just yet. I was completely surprised at how easy these were to throw together. Here is a step by step tutorial, thanks to Chris, to convince you that these babies are not difficult at all to make. And really the thing that takes the most time, is just waiting for the dough to rise. I am pretty sure nothing compares to a light, fluffy, homemade donut dusted with sugar!  

Malasada Tutorial


Mix yeast, sugar and warm water. Set aside to proof.


In a large bowl, mix flour and salt together. Make a well.


In another bowl, whip eggs until smooth.


Add yeast to flour mixture.


Also add eggs, sugar, honey, melted butter, milk, and water. 


Mix together.

Whip it, until it becomes doughy.


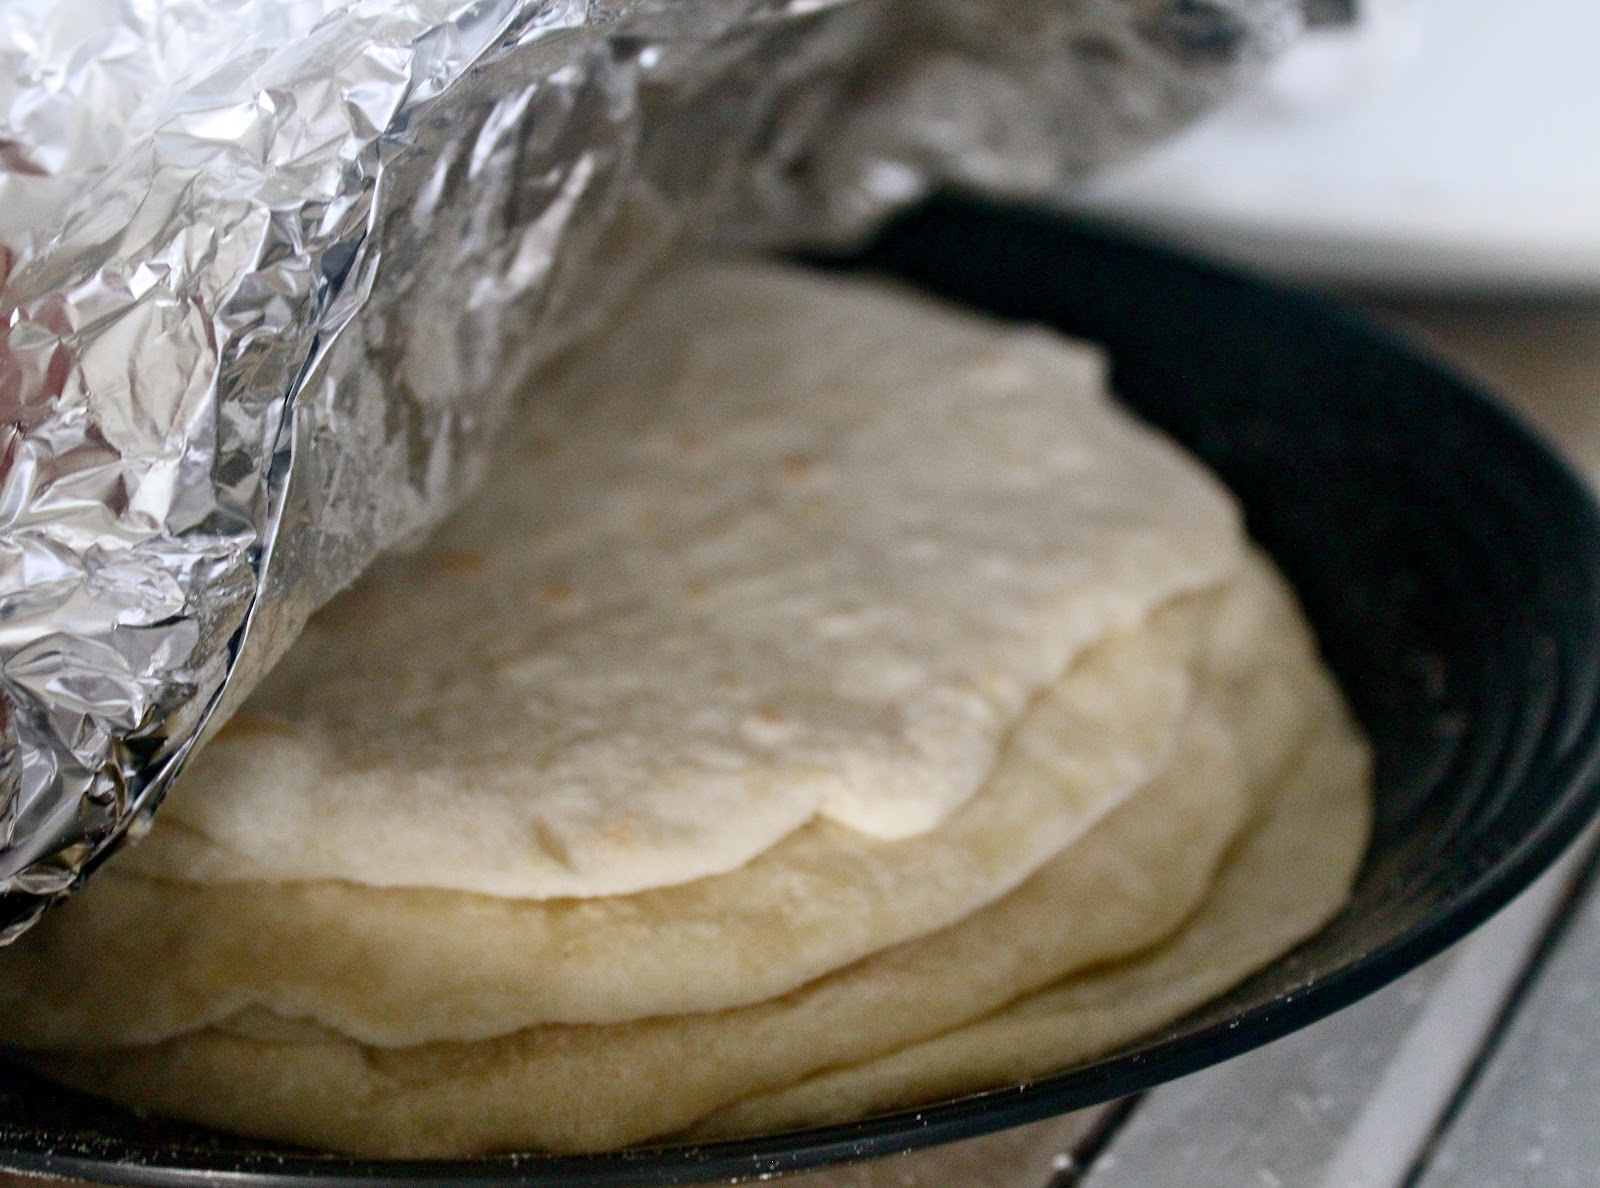
The dough is really sticky at this point. Cover and let rise until doubled. 


After the dough has doubled in size, you are ready to fry these puppies!


We used the piping bag method. Not having any piping bags available we used a ziplock bag. Just put the dough in a ziplock and cut a good chunck off of the end.


When the oil is hot, you are ready to drop the dough. Just squeeze the dough (just a little bigger than a doughnut hole) into the hot oil. 


Watch them carefully. When they look like they are browning on the bottom, flip them over. 


When the doughnuts are nicely browned, take them out of the oil and let cool on a paper towel. 


It's a good idea to break one of the first ones open to make sure they are completely cooked and not doughy in the middle.

Then place the doughnuts in a rubbermaid container that has sugar in it. Place lid on and shake around until the doughnuts are covered with a nice sugar coating.


These little bites of heaven are seriously amazing! Enjoy!


Thanks so much Chris for hosting this! Everything was so much fun! I can't wait for the next
Un Poquito Cafe con Blogging y Comida! 
Pin It!

May 26, 2012

Brown Sugar Scrub


I tried out a recipe I came across for a brown sugar scrub. It was so easy to throw together and made my skin feel so nice and soft, even added a little glow! I found the recipe here. I thought it needed a little something more by way of scent though. I made two different batches, one using peppermint extracts and another using vanilla and almond extracts. Both smelled amazing. I can't wait to try this out again experimenting with different scented oils. 

I made this scrub for a Young Women's activity (I teach the young women in my church). I taught the girls how to make their own brown sugar body scrubs. They got to make them for their moms for Mother's Day! The girls loved making them and they were such a hit that a week later some of them were asking me to help them make more! This makes such a great inexpensive gift! Try it, I promise you will love it!


Brown Sugar Scrub


1 cup brown sugar
1/3 cup extra virgin olive oil
2 tablespoons honey
peppermint oil (or use whatever oil you like best)

Combine all ingredients. Place in a cute jar.


Pin It!

May 23, 2012

No-bake Cheesecake with Mango Passion Fruit Drizzle


One of the best things about living in the Caribbean is the delicious tropical fruits available. The mangos here are so much better than the ones we would get in the states. There are a few different kinds of mangos and there is one in particular that is my favorite. It is a greenish red mango and it has a silky texture inside, it falls right off of the pit and the strings don't get stuck in your teeth. My favorite so far! I had a few mangos and passion fruits that were just laying around waiting for me to make something with them. So I decided to use them to make a fruit drizzle to top off my mom's no bake cheesecake recipe. The lemon in the cheesecake complimented the tropical fruits and the flavors just came together. Typically, I top this cheesecake with blueberries or raspberries, but since berries are scarce here in the Caribbean, I experimented with something more tropical. I used coconut cookies for the base of the crust. Delish. This is one of those desserts that is even better the next day as well. Unfortunately, this didn't last longer than the day after, but I can tell you it is just as good a week after. I love this dessert. And the cheesecake takes me back to my childhood. This was a staple at our house growing up. You would never know it was so easy to make.


Coconut Cookie Crust


3/4 package coconut cookies
1/2 - 1 stick butter, melted
1/4 - 1/2 cup sugar

Crush cookies and place in a bowl. Add in melted butter and sugar. Mix to combine. Press into a round 9" pie dish. Refrigerate while making cheesecake mixture. (I typically put mine in the freezer just to set it a little faster.)

*Note: Mom's cheesecake is made using 1 package graham crackers. Same measurements of everything else.

Mom's Amazing No-Bake Cheesecake


1- 8 oz. cream cheese, softened
1 can sweetened condensed milk
1/3 cup lemon juice
1 teaspoon vanilla extract

Beat cream cheese with mixer until smooth. (Don't skip this step- If you just add everything together before beating cream cheese alone it will  go lumpy). Add sweetened condensed milk, lemon juice and vanilla. Mix until smooth.

Pour cheesecake into crust. Chill for 3 hours. Serve.

Passion fruit on the left, mangos on the right

 I peeled the mango and cut it up, and then threw in the pit as well. I wanted to get as much juice as possible. With the passion fruit I just scraped out all of the seeds and juice and added it in the pan.


Mango Passion Fruit Drizzle


3 mangos
3 passion fruits
1/4 cup water
1/4-1/2 cup sugar
1 teaspoon vanilla extract

Add fruit of mangos and passion fruits to a medium size saucepan. Bring to a boil, stirring frequently and mashing fruit with the back of spoon. Add water and sugar. Boil about 7 minutes. Add vanilla.

Holding the strainer over a bowl, strain the fruit, reserving the juice. It helps to press the fruit with the back of spoon to make sure you get as much juice as possible. Taste and add more sugar, water, vanilla, etc... to taste.

Pour juice back into pan and boil for 2 minutes. Remove from heat and cool. Drizzle over cheesecake.

We actually made sushi the same night we made this cheesecake. And used some of the Mango Passion Fruit drizzle to make a dipping sauce for the sushi! It was so good! When it comes to mangos and passion fruit the options are endless! And if you don't have mangos and passion fruit available you can always substitute another fruit that is in season. Happy baking!
Pin It!